How to Create, Share & Track Content Packs in Salesforce

My dad had a Swiss Army knife. When we were kids, we watched him start a fire, repair a tent, re-hang a door, and open a bottle of wine with that thing. It was always accompanied by much swearing as he tried to figure out which doo-hickey he needed for the job, and then tried to get that tool out of the knife.

Salesforce is like the Swiss Army knife of customer relationship management. There's so much you can do with it beyond tracking leads, contacts, accounts, and opportunities. In fact, many companies are only using about a tenth of the platform's capabilities. Why you ask? Well, figuring out how to use it requires either a degree in nuclear physics or a Certified Salesforce Administrator. Luckily for our clients, we've done our homework and passed that test!
One of my favourite hidden secrets of Salesforce is its robust content management capabilities, so that's what we're going to focus on today.
In this tutorial blog, you'll learn how to:
Create pre-approved content libraries in Salesforce
- Enable sales reps to package their own content and share it via a single link
- Track when contacts have opened and downloaded the content
Didn't know you can do this in Salesforce? Well, you can! Here's how:
Step 1: Enable Salesforce Content Pack Creation
This is one of those things that is not yet fully enabled in Lightning, so switch to Salesforce Classic (click your avatar in the upper right, then hit Switch to Salesforce Classic). Next:
Go to Setup.
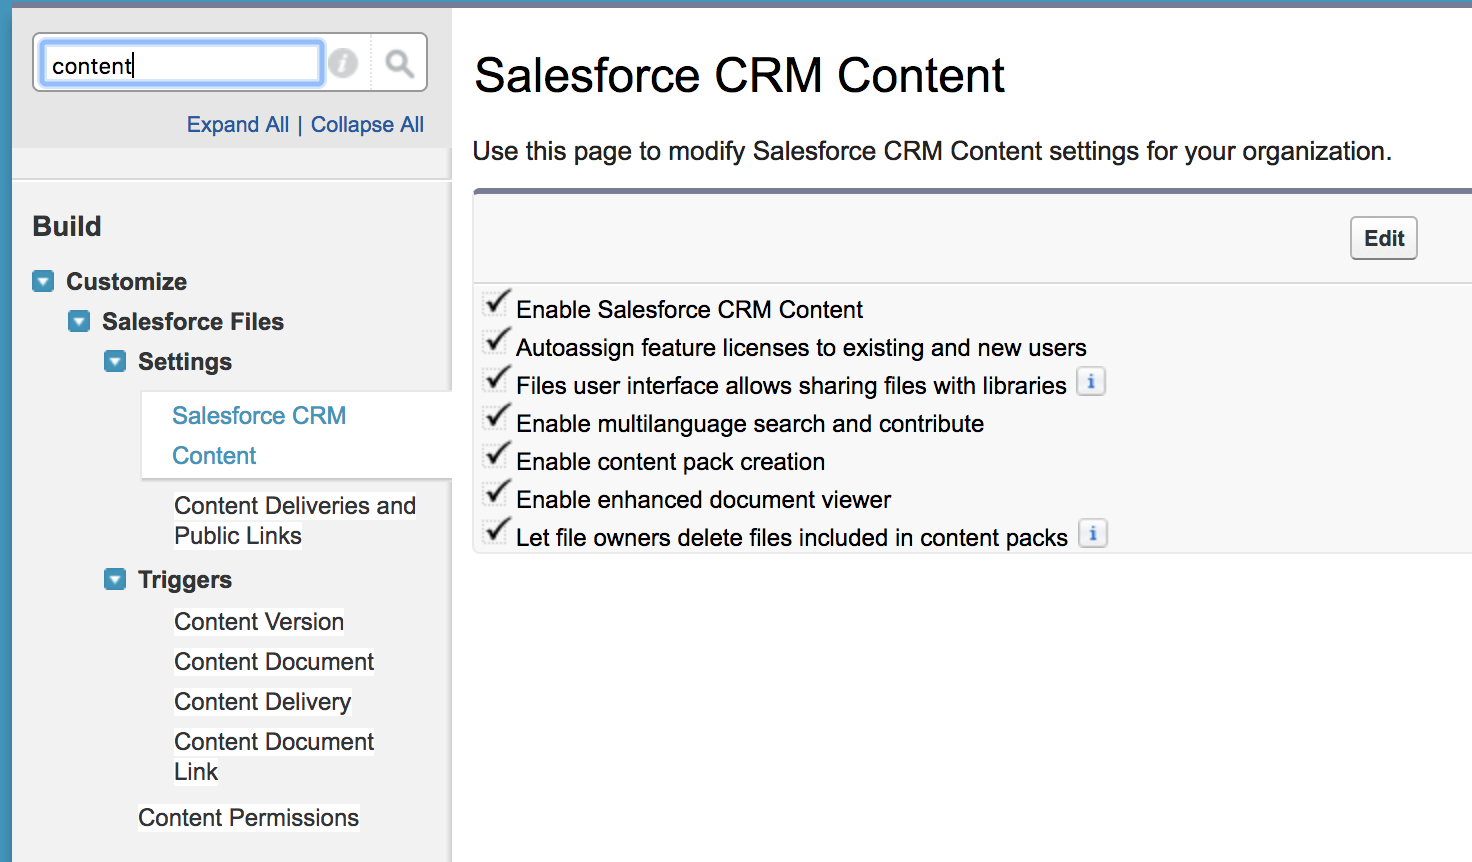
- In the search box, type Content, which will return Salesforce CRM Content under Build > Customize > Salesforce Files > Settings.
- Click the Edit button, then tick all the boxes.
You've now enabled Salesforce Content for your organization. Next step is to enable delivery outside your organization.
Step 2: Enable Salesforce Content Deliveries
In Setup, type Content Deliveries into the Search box, then:
- Click on Content Deliveries and Public Links.
- Click Edit, then tick all three boxes that appear.
- Finally, tick the radio button that says password not required.
Terrific. You've now enabled the creation of public links (URLs) to content, either individually or in a "content pack." Next we'll create some content, put it in a library, and give users access to the library.

Step 3: Add Files and Create Salesforce Libraries and Content Packs
This is reasonably intuitive and best done in Salesforce Classic, so click your avatar in the upper right and click switch to Salesforce Classic. Then:
- Click the + sign in the navigation bar (next to Contacts Accounts Leads etc.).
- Select Libraries. Add a few files from your computer to Libraries.
- Click Create New, then Content Pack.
- Drag and drop the files you want into the content pack.
- Add the users you want to share this library content with, and give them access levels within the library (Viewer, Author, or Library Administrator).
Next, we'll make sure the users we've added to our library have permissions to deliver the library content.
Step 4: Ensure Library Users Have Permissions to Send Content
Now, we need to make sure the users in our library can actually send the content in it (yes, Salesforce takes a pretty locked-down approach to security). Here are the steps:
- In Classic, go to Setup, then type Content Permissions.
- Up will pop a Library Permissions dialogue, allowing you to set permissions for Viewers, Authors, and Library Administrators.
- Make sure the Add Content, Attach or Share Content, and Deliver Content boxes are ticked.
For good measure, you could also create a permission set allowing users to deliver content outside of specific libraries. To do this:
- In Setup, go to Users, then Permission Sets, then click New.
- Name your permission set.
- Near the bottom of the next screen, click System Permissions.
- Then tick the boxes for Create Content Deliveries, Create Public Links, and Select Files from Salesforce.
- Save, then click Manage Assignments and assign to your users.
Step 5: Send a Content Pack to a Prospect
Finally. We're ready to send our content pack to a prospect. All this one-time setup work has made it easy for sales reps to actually share relevant content:
- Return to Libraries.
- Click the content you are interested in sharing, then click details to open the File Sharing Settings window in the upper left.
- Click share via link.
- Copy the link, and paste it into an email to one of your contacts.
Step 6: Track Content Views
There's a pretty big benefit at the end of all this work. The Content Pack is delivered in a link, allowing easy transmission of large files, which prospects can then choose to download or not, as they wish. Because the Content Pack is delivered as a web page URL, it is also easy to track the number of times a prospect has viewed our content, and when they viewed it (just like Google Analytics can track hits to a web page).
This allows sales reps to follow-up with the most interested prospects, on a timely basis. All that's required is for your Salesforce Administrator to add the Content Deliveries Related List to the Contacts page layout. In Salesforce Classic, you can then see who has viewed your content and how many times. Here are the views in the Contact record "Heather Simmons," in our client's Salesforce, showing I've viewed each of the content packs 5 times:

There you have it. Salesforce content management, integrated with Salesforce customer relationship management. See how easy that was?

You can do all of this setup yourself, or you can let Simmons Sharpe do it for you. We are Certified Salesforce Administrators and we'll set up your Salesforce platform, including user setup, security, and content delivery, for as little as $7,000.
If you need help on an ongoing basis, we can also integrate marketing campaigns, promotions, sales activity, and reporting, so you can focus on closing deals. Shoot us an email and we'll get started.
